CS210 Project 2
Bob Wilson
Creating a Fractal Image Iteratively and Recursively
According to Wikipedia:
A fractal is a rough or
fragmented geometric shape that can be split into parts, each of which is (at
least approximately) a reduced-size copy of the whole,"[1]
a property called self-similarity. Roots of mathematical interest in fractals
can be traced back to the late 19th Century; however, the term
"fractal" was coined by Benoit Mandlebrot
in 1975 and was derived from the Latin fractus
meaning "broken" or "fractured." A mathematical fractal is
based on an equation that undergoes iteration, a form of feedback based on
recursion. [2]
[1] Mandelbrot, B.B. (1982). The Fractal Geometry of Nature. W.H. Freeman and Company
[2] Briggs, John (1992). Fractals:The Patterns of
Chaos.
The fractal image that you will be creating in this project is based on a triangle. It is similar to but not exactly the same as a Sierpinski triangle. See this screen capture:
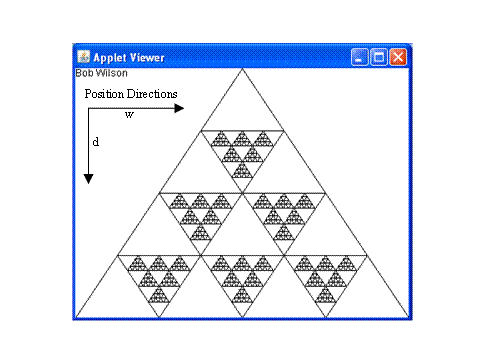
Each lower level triangle is drawn in a self-similar shape at a new position within the current level triangle. Each of the six inner lower level triangles is smaller and upside down relative to the higher level triangle. For drawing, the coordinates of the corners are indicated by w (the position within the width dimension) and d (the position in the depth dimension). I provide an initial value of w and d for the corners of the outer triangle. You will need to write the code in the Triangle class to calculate the corners of each of the inner triangles from the current triangle.
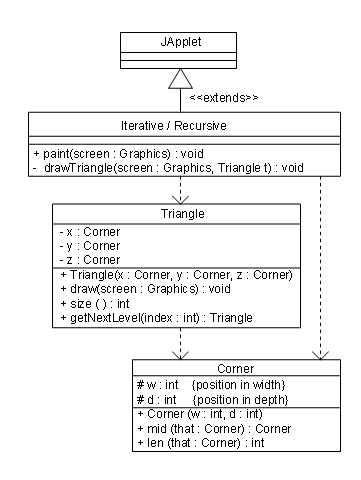
There is a Project2.zip file that you should download to get started on this project. Unzip it and create a Dr Java project file in the directory. Open the .java files in the Dr Java project. Study the code and comments to understand them. This UML class diagram shows the relationship between these classes.
There are also some symbolic constants defined in the Triangle class to use as index values to differentiate between the six lower level triangles within each triangle. I have used names that indicate three of the lower level triangles are in one of the three corners of the current triangle and that three of the lower level triangles are along one of the edges of the current triangle. Where needed in your code, you should always use symbolic constant names - never hard-coded numbers.
The Triangle Class
The triangle class encapsulates three Corner objects that define the w and d position of each corner of the triangle that it represents. The Triangle class has a constructor that creates a Triangle object with three Corner objects provided as parameters. This overloaded constructor is provided for you.
The getNextLevel(int index) method calculates the corners of a selected (index) lower level triangle and returns it as a Triangle object. You must write the code for this method to create and return one of the lower level triangles shown in the screen capture based on the index supplied. You must figure out how to calculate the three new corners using the midpoints of the edges of the current triangle. There is a mid method in the Corner class that may be useful. Be sure to generate the corners of each of the new triangles so that it is oriented upside down relative to the current triangle.
The size( ) method calculates the size of the triangle and returns the int value. This value is used in each of your applet classes to determine if the current triangle has gotten too small to continue drawing its sub-triangles. You must write the code for this method also. (Base the size on its geometric perimeter.) There is a len method in the Corner class that may be useful.
The Corner Class
The Corner class encapsulates the w and d pixel values on the screen for one corner of a triangle. As shown in the legend on the screen capture, the w (width) dimension goes left to right and the d (down) dimension goes top to bottom. The code for this class is provided to you.
Iterative Version of the Applet
In the iterative version of the Applet, you should instantiate the stack that you need to save the Triangle at each level. You push the initial triangle received as a parameter onto the stack to start the iteration.
Then use a while loop with a condition based on whether there is still another triangle in the stack. In the body of the loop, pop the next triangle off the stack. Process it by drawing it and based on its size determine if you are going to draw its next lower level. If so, get each of the six next lower level triangles from the Triangle getNextLevel(int index) method and push it onto the stack. When the body of the loop stops pushing lower level triangles onto the stack, the while loop will complete the drawing of the triangles down to that level and exit. The Triangle class has a symbolic constant SMALLEST that you can use to terminate drawing before the triangles get too small to see.
Recursive Version of the Applet
In the Recursive version of the Applet, you do not need to use an explicit stack. Also, there must be NO iteration statements (while, for, or do … while). You must use selection statements (if – else or switch) and recursive calls only.
The process is similar except that the recursive drawTriangle method calls it self. Process each triangle by drawing it and based on its size determine if you are going to draw its next lower level. If so, call drawTriangle six times – once with each of the next lower level triangles obtained from the Triangle getNextLevel(int index) method. When your code returns from each recursive call to drawTriangle, the context of the previous level of recursion will be automatically restored.
Iterative Version of the Applet Again
When you have finished both the iterative and recursive versions of the Applet, You should experiment with a variation on the iterative version. Although it is traditional to use a stack when implementing iterative versions of recursive methods, in this project you can use a Queue instead of a stack.
Instead of the Stack, use the java.util.Queue interface and the LinkedList implementing class. Comment out all lines of code that use the Stack and replace them with a similar line of code using the Queue instead. Your applet should still produce the same drawing. If so, what is happening that is different? Answer the questions below in your report.
Tips
To run either of your Applet files, select the one you want to run and use the DrJava Tools menu, “Run Document as Applet” command. That will invoke the AppletViewer on your applet file. Alternatively, you can open the provided Applet.html file with your browser. Applet.html will show both your iterative and recursive drawings side by side. (For some reason, the html file display cuts off the lower side of the outer triangle for both Applets.)
Overall:
You must write comments in your code to document the design of your program. For this assignment, these comments must be written using the Java style single line comment by beginning a comment line with // or putting // and a comment at the end of a line of code. Try to make these comments useful to the programmer who will be reading them and not just an English re-statement of the contents of the line(s) of code.
Report (memo.txt):
For this project and all projects in this course, the memo.txt file that you upload to the turn-in system MUST BE A PLAIN TEXT FILE - NOT A WORD (.DOC or .RTF) FILE. On a Windows PC, I recommend that you use Notepad to create this file. On a MAC, you must use a suitable editor to create a plain text file. In this text file, answer these questions:
In your own words, compare the design of the iterative method with the design of the recursive method. What equivalent things are happening and where do they happen in each solution?
Why did the iterative version of your Applet produce the same drawing with a Stack and also with a Queue? Explain what did happen differently when you used a Queue instead of a Stack.
Turning in your Assignment:
Use the secure file transfer program to upload your Project2 folder containing your .java files and memo.txt file to your UNIX file directory: “account/cs210” where “account” is your account ID.
You must upload the files to our UNIX system before the posted deadline. You will get no credit for late submissions. Plan your time carefully so that you have enough time to upload your files. If you have not finished, upload your files on time anyway - even if the program does not work correctly yet. That way you are eligible for part credit on the assignment. If you upload your files more than once, only the most recent copy will be saved.