NAME(S) ____________________________________________________________________
CS 341 – Lab 10
Computer Architecture and Organization
Controlling the Speed and Direction of a Servomotor, and Calibration
Equipment: Arduino UNO microcomputer, PC with Arduino IDE installed, and a USB cable.
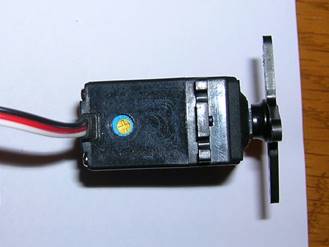
Parallax Continuous Rotation Servo
Your assignment is to connect a continuous rotation
servomotor to the Arduino board, control the speed and direction of rotation of
its arm, and calibrate it for zero speed.
Normally, a CR servo is used directly only in light load applications
where precise control is required. A CR
servo may be used to turn the wheels of a small remote controlled vehicle
moving it forward or backward at a controlled speed. It may also be used to feed paper in a
printer, copier, or other paper handling device. For large load applications such as a truck
engine, a standard servo might be used to control the gas and/or brake
pedals.
The Parallax Continuous
Rotation Servo provides information on programming the speed and direction
of the CR servo. As in previous Parallax datasheets, the
software examples shown are based on a different language and library so you
can only use it for guidance and cannot use that code directly in our project.
All the instructions for setting up the
Standard Servo and coding the sketch in Lab 9 apply here for the CR Servo. However, the value written to the PWM output
controls the direction and speed of the servo instead of the position. A value of 90 should cause the Servo to
stop. A value larger than 90 should
cause the Servo to rotate in one direction at increasing speeds. A value smaller than 90 should cause the
Servo to rotate in the other direction at increasing speeds. Copy your sketch from Lab 9 and run it. It should be transferring the position of the
pot knob/shaft to the speed and direction of the CR Servo. Demonstrate that you
can position the pot control to stop the turning motion.
However, there is an additional
calibration step that would be required for a practical application of this
servo. When the value 90 is written, the
servo is supposed to stop turning.
However, that value may leave an “uncalibrated” servo moving in a slow
but still continuous rotation. This
could be a problem for the application of the device containing the servo. We can handle the calibration in either of
two ways:
We can find a value – typically near the
90 value - that stops the servo. After
we find such a zero value, we store it in configuration memory such as in an
EEPROM. (See Lab 3.) When we program the
servo to move in either direction, we retrieve the calibration zero value and
add or subtract a number proportional to the desired speed in that direction.
There is a calibration screw on the CR
Servo next to the location where the three wires are attached. This can be used to calibrate the device so
that 90 is the correct value for a dead stop.
This calibration step would normally be done by a technician (or a
robot) at the factory prior to shipping a product that includes CR servos.
Modify the loop function in your sketch to
output the value 90 instead of the value from the pot/analog input. Run the sketch and observe the motion of the
servo. It probably won’t be at a dead
stop. (If it is actually at a dead stop,
use a small Phillips screwdriver to turn the adjustment screw by few degrees so
that it starts turning slowly in either direction.) In this state, it is not properly
calibrated.
To determine a zero value, change the
value 90 in your sketch plus or minus a small amount and experiment until you
get the servo to stop turning. Record
the value that works here: ____________.
Change your sketch back to writing the
value 90. While your sketch is
continuing to write the value 90, use a small Phillips screwdriver to adjust
the screw until the servo is at a dead stop.
Either way your control for the servo is
now properly calibrated.
DETACH THE BATTERY TO PREVENT IT
FROM CONTINUING TO RUN THE ARDUINO BOARD AND DYING IN THE BOX!
Since this is the last lab session of the
course, you won’t turn in a lab report next week. Show the TA that you have properly calibrated
your CR servo to get credit for this lab.
___ / 10