Gcc Development on
Windows, including for SAPC, Android
Of course you can do all your development for CS444 by remote login to our Solaris UNIX servers, notably ulab.cs.umb.edu, which has the connected SAPCs needed for running your programs. However, you might want to develop on Windows and transfer the files to ulab for running. This file discusses that possibility.
In the past, developers used Cgywin to set up a UNIX/Linux-like environment on Windows, in which gcc and its related tools could be run. More recently, a simpler option has become available with MinGW, a "Minimalist GNU for Windows" which supports GCC/tools. Once MinGW is installed, you can use command-line gcc in the ordinary Windows CMD window ("DOS box"). Also, the C/C++ Eclipse IDE supports MinGW as a "toolchain", so you can develop in C in the comfort of the eclipse GUI, as you may already be doing for Java.
Installing MinGW: download mingw_get_setup.exe from http://sourceforge.net/projects/mingw/files/
and run it. Select all packages except ada, fortran and objc. Then use
Installation>Apply Changes to get the install to proceed.
For simple command line use, install MinGW, and add its bin directory to your
Path. Then get a new CMD window to see that gcc is now available at the command
line. For ordinary programs, MinGW will build Windows executables that
can be run from the command line. For cs444, however, we can compile code on
Windows, but cannot run it there. To actually execute one of our programs, we
need to transfer the sources to the ulab.cs.umb.edu system and rebuild them
with the cross-compiler and cross-loader, and then use mtip to access the
online SAPCs, as described elsewhere.
On Windows in a CMD window, with MinGW installed:
C:\cs\cs444> gcc test1.c (simple hello program)
C:\cs\cs444> a.exe (run it on Windows, since it is a portable program)
hello world!
C:\cs\cs444>
To run this program on SAPC, transfer test1.c to ulab.cs.umb.edu, copy the makefile from $pcex, and “make C=test1”, then use mtip to execute it.
UNIX commands for your CMD windows The MinGW distribution comes
with a good set of UNIX/Linux commands: ls, grep, diff, du, etc. Just add its
msys\1.0\bin to your PATH, get a new CMD window, and try out your favorite UNIX
commands. Note that a few have the same
name as standard Windows commands, for example find and dir, so the order in
the PATH definition is important. If necessary, rename find.exe to ufind.exe
for example.
For C/C++ eclipse, download the C/C++ Eclipse IDE. If you already have
the Java or JEE eclipse IDE, you may want to specify a different workspace
location when you first run the IDE, although you can access Java projects from
the C/C++ Eclipse IDE.
In the C/C++ eclipse GUI, read the Help> "C/C++ Development User
Guide"> "Before You Begin" before you try to set up a
project. It's not as easy as the Java case. This writeup suggests that you
download the MinGW distribution, as discussed above. Once that's working at the
command line, it's time to try to set up a project in eclipse.
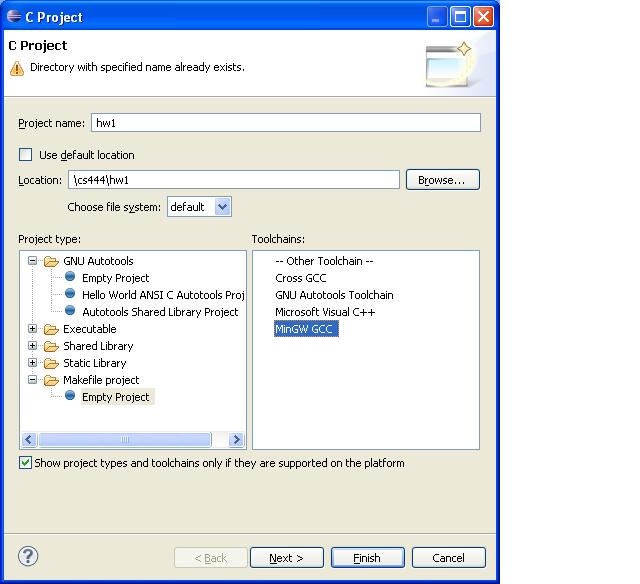
For cs444, we will be using makefiles to build programs. To set up a new C
project, do New>C Project, give it a name and location (unchecking “Use
Default Location”), and choose project type Makefile project>"Empty
Project", and choose MinGW in the toolchain area. See image
below.Then click Finish. The makefile that will be running the project lives in
the base directory of the project. So the simplest arrangement is put all
the .c files in the base directory as well. (Note that this is different from
what we usually do for Java projects, where we have a "src"
directory.) If you do use a src directory, just remember that the makefile that
matters is in the base directory. To fit the default settings of eclipse
projects, the makefile should have an “all” target for building, and a “clean”
targer to clean the directory.
To build the project, right-click its icon in the Project Explorer, and chose Build Project, and similarly to clean the project.
What makefile to use? Note that $pcex has makefile.offsite, the offsite-version makefile. To set up to compile the examples directory on Windows:
1. Create directories include and examples within a pcdev directory on your Windows PC
2. Transfer $pcinc to the local include directory: when cd’d to that directory:
pscp user@linux1.cs.umb.edu:/groups/ulab/pcdev/include/* .
3. Transfer $pcex to the local examples directory: when cd’d to that directory:
pscp user@linux1.cs.umb.edu:/groups/ulab/pcdev/examples/* .
4. Make the offsite makefile the default makefile
copy makefile.offsite makefile
5. mingw32-make clean This should run the make tool from MinGW.
6. mingw32-make C=timer This should compile timer.c and create timer.opc. We can’t build timer.lnx on Windows
7. mingw32-make test.exe This should compile and load test.c creating test.exe, a Windows executable. Note that test.c is a portable program, i.e., it can run both on a real OS and also on SAPC.
8. mingw32-make all should compile all the examples.
9. Once all this works, try setting up the eclipse project.
Android C
Programs
You can write C programs and run them on Android Linux with help from MinGW. Android development uses cross-compilation to the CPU of the Android device, typically an AMD processor system. MinGW is creating x86 machine code, not AMD, but it is still useful for compilation of tools that themselves produce AMD machine code.
Download the NDK (native development kit) from the Android website and install it (i.e., unzip it to a convenient place like c:\android-ndk.) This gives you the needed cross-compilation tools, or “toolchain”, for producing AMD machine code, once they are compiled from .c files. The Android documentation says you need Cgywin to get the needed C compiler, but MinGW is just as good. As long as the C tools are on the PATH, the Android build command ndk-build will work fine.
Most articles and documentation on Android only cover the case of calling C from Java programs, but it’s perfectly possible to run a normal C program on the underlying Linux system of Android. The NDK has a sample “hello world” program under tests\device\static-executable in the NDK area. The program itself and the needed .mk files are in the jni subdirectory. To compile this, use “ndk-build” in the upper directory. Of course you need the NDK build tools on your PATH for this. The resulting Android executable is in static-executable\libs\armabi\static_main. You can copy this to your Android device or AVD (Android virtual device, via the emulator) using adb:
C:\...\libs\armabi\> adb push static_main
/data/local (a writable location on
the Android Linux filesystem)
C:\...\libs\armabi\> adb shell (start a shell on
the Android device)
# cd /data/local
# chmod 777 static_main (make it executable)
# ./static_main
Hello static world!
#
If you have a Linux system, of